


Elbow Circles Directions:
Step 1: Begin by standing with your heels together and toes straight ahead. Your arms should be extended in front of your body. Your palms will be face up with the pinky sides of each hand touching (like you would put your hands together to receive something.) Your elbows are slightly bent and relaxed (Figure 111).
Step 2: You will inhale and allow the elbows to slowly bend. As your hands near your chin during the motion, you will slightly curve them upward and inward to go under your chin (Figure 112).
Step 3: As your hands curve under your chin, they will pass your throat and the upper chest until the backsides of the hands eventually touch. While this motion is occurring, your elbows will simultaneously move outward (Figure 113).
Step 4: As the arms begin to slightly rise and extend outward, you will begin to exhale. As the arms rise and extend, the palms will be turned during the motion and now face downward. So, your thumbs and index fingers will now be touching. (Figure 114).
Step 5: Continue exhaling through the complete extension. As the extension occurs, you should allow the natural force of the motion to pull your shoulders forward, thereby placing your body weight on the balls of your feet (Figure 115).
Step 6: As the palms turn up again, with pinkies touching, you will begin to inhale (Figure 13).
Step 7: You may continue the elbow circles six to eight more times.
Step 8: Now, reverse the movements. Inhale and slowly bend the elbows. The hands will curve slightly inward and downward this time
Step 9: As the hands, pass down toward the chest, the backs of each hand will now be touching. The elbows will be swung outward (Figure 116).
Step 10: Your inhalation should be finishing as the hands pass under the chin and each hands’ pinky fingers come together. (Figure 117).
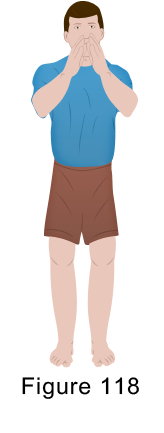
Step 11: As you begin to exhale, simultaneously extend your arms slightly down and out and circle the palms. At this point, your index fingers will connect with each other and your thumbs will connect with each other (Figure 118).
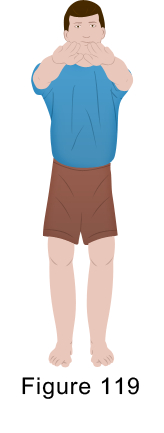
Step 12: Continue exhaling through the complete extension. As the extension occurs, you should allow the natural force of the motion to pull your shoulders forward, thereby placing your body weight on the balls of your feet (Figure 119).
Step 13: You may repeat the (reverse) elbow circles six to ten more times.
Key Points:
* your shoulder and elbow joints should be relaxed and soft during the movements
* you should feel how the shoulders circle and engage the back muscles as your arms extend
* let the natural force of the motion pull you forward so that your weight is on the balls of your feet
|
Home
::
|
Elbow Circles Exercise
-
 Chronic Sinew Liniment$39.95 (€29.96)
 -
 Acute Sinew Liniment$39.95 (€29.96)
 -
 Sinew Sports Massage Oil$29.95 (€22.46)
 -
 Sinew Herbal Ice$34.95 (€26.21)
 -
 Sinew Injury Poultice$37.95 (€28.46)

