


Arms In And Out Directions:
Step 1: Begin by standing with your feet at shoulder width and with your toes pointed straight forward. Your arms should be raised to shoulder height. Your fingers should point forward. Your palms should face downward (Figure 104).
Step 2: You should inhale as you concurrently move your arms further apart and turn the palms upward. This motion should continue until your arms are pointed outward from the sides of your body and your palms are fully upward facing (Figures 105 and 106).
Step 3: Exhale.
Step 4: As you continue to exhale, you will now slowly and concurrently move your arms closer together again and turn the palms downward. You will finish the movement back at your starting position (Figure 104)
Step 5: You may continue the arms in and out exercise eight to ten more times.
Key Points:
* your shoulders should be relaxed during the movements
* you should sense that the outward movement is initiated from the mid-back and the inward movement is initiated from mid-chest.
* your breathing should be coordinated with each movement. For example, as you initiate an inhalation, you will begin to move the arms outward and as you’ve completely inhaled, your arms should be at the end of the movement.


Arm Twists Directions:
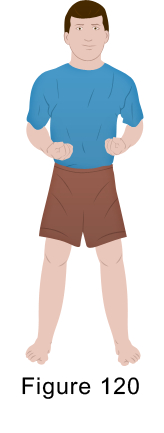
Step 1: Begin by standing with your feet at shoulder width. Both your hands are fisted, palm up, and placed near your lower ribs (Figure 120).
Step 2: Exhale at the beginning of the movement. As you extend your arms outwardly from the body and slightly upwards, you will also slowly pull them inward for the backs of the hands to eventually face each other. The end motion will be full extension, with your arms at shoulder height and the backside of each hand facing one another (Figure 121).
Step 3: Inhale as you circle the arms outward. While your circling your arms, you will progressively draw the fingers in toward the hand one at a time, starting with the pinkie finger and ending with the thumbs, to form a fist (Figure 122). You will also be simultaneously pulling the hands toward the body until they are returned to the hips in a palm up position (Figure 120). You shouldn’t use muscle tension, but it might be helpful to visualize yourself pulling a very heavy object toward you.
Step 4: You may repeat the arm twists for eight to ten times.
Key Points:
* allow the elbows to graze the ribs as you return them to the starting position
* full extension will slightly pull the shoulders forward and inwardly circle them.
* circle the shoulders outwardly for the elbows to face down and use the back muscles and torso muscles to pull the arms back in.


Arm Circles Directions:
Step 1: Begin with your feet at shoulder width, toes pointed forward, and arms by your sides.
Step 2: Inhale, loosely fist your left hand, and slowly raise your arm out (Figure 107).
Step 3: You will continue inhaling until your arm has reached overhead your body (Figure 108).
Step 4: You will begin to exhale as the arm circles in a 360 degree circle to the rear and back to your beginning position (Figures 109 and 110).
Step 5: You should perform six to ten repetitions with the left arm.
Step 6: Now, reverse the movement direction and perform six to ten repetitions .
Step 7: Repeat steps one through six for the right arm.
Key Points:
* don’t neglect your breathing - inhale with the arm rising and exhaling as the arm lowers
* as you go about the arm circles, you should pretend that the arm is moving through a resistance, like it does while swimming
* your elbows should be slightly bent and relaxed
* the muscles in your neck should be relaxed
* as you raise your arm, you should try to keep your shoulder from raising with it
* your eyes should look forward during the exercise


Knee Circles Directions:
Step 1: Begin with your feet placed together. Your knees should be locked. Your hands should be on top of your knees (Figure 137).
Step 2: You will bend your knees and gently circle each in a clockwise circle. (Figures 138,139,140).
Step 3: The circle will end by returning the knees into the beginning locked position (Figure 137).
Step 4: You may repeat the knee circles for six to ten complete circles.
Step 5: Now, you will bend your knees and gently circle each in a counterclockwise circle, ending in a locked position.
Step 6: You may repeat the (counterclockwise) knee circles for six to ten times.
Key Points:
* you shouldn’t force the knee into a locked position, rather gently allow them to lock
* breathe naturally
* you shouldn’t exceed the knees normal range of motion


Neck Turn Directions: (Section 1)
Step 1: Begin by standing with your heels together, toes straight ahead, and arms by your sides.
Step 2: As you inhale, you will slowly begin to turn your head to your right. Let your neck muscles stay relaxed as your neck turns. You don’t want to force the movement. You should also be visualizing the spine and allowing your inhalation to assist your torso muscles to relax. As your neck turns, the entire spine turns on an axis (Figure 100). So, you should feel like a rod is running from the top of your head to your tailbone.
Step 3: Exhale. You will now slowly return your head back to center, while keeping the torso and neck relaxed and feeling the entire spine turn with your head. (Figure 101).
Step 4: From center, you will repeat the neck circles, but this time turning your head to your left.
Step 5: You may continue performing the neck circles for four to six repetitions on each side.
Neck Turn Directions: (Section 2)
Step 1: Begin by standing with your heels together, toes straight ahead, and arms at your sides.
Step 2: Inhale while you slowly lift your chin toward the ceiling and lengthen the front of your neck, thereby causing the top of your head to go backwards and upwards. The torso and front of your neck should be relaxed as you raise your chin, but you should feel a gentle stretching from your head to your pubic bone (Figure 102).
Step 3: Exhale while you bring the head downward and forward toward the chest and lengthen the back of your neck. Visualize yourself pointing the center of the top of your head toward the ceiling and relax the torso and back of the neck. Be careful not to force your chin to your chest; you will feel the stretching running from your neck to your tailbone (Figure 103) and know when to stop.
Step 4: Slowly return your head to center.
Step 5: You may continue performing the neck turns for four to six times.
Key Points:
* you should try to keep the neck muscles as relaxed as possible.
* allow the head and neck to turn, never forcing the movement.


Neck Tap Directions:
Step 1: Begin with your feet at shoulder width and your toes straight ahead. Your arms will be by your side.
Step 2: You will bend your right elbow and inhale.
Step 3: Still inhaling, you will make an upward, overhead, and then downward swinging motion with your right hand. The motion will end as the palm of your right hand makes contact with the seventh cervical vertebra (taps it.) Anatomically, this is the large bump found at the base of your neck (Figures 125 and 126).
Step 4: Exhale and allow the arm to gently drop back into the beginning position.
Step 5: Repeat the same swinging motion using the left hand.
Step 6: You may continue alternating left and right neck taps for fifteen to twenty repetitions on each side
Key Points:
* your arm should be loose and relaxed
* rather than using force, let the arms’ weight fall to make contact with the seventh cervical vertebra
* inhale as the arm swings and exhale as the arm drops to the beginning position.
* you should try to keep your shoulder down as the arm swings
* you should have your head erect and your eyes straight ahead during the neck taps
ELBOW CIRCLES


Elbow Circles Directions:
Step 1: Begin by standing with your heels together and toes straight ahead. Your arms should be extended in front of your body. Your palms will be face up with the pinky sides of each hand touching (like you would put your hands together to receive something.) Your elbows are slightly bent and relaxed (Figure 111).
Step 2: You will inhale and allow the elbows to slowly bend. As your hands near your chin during the motion, you will slightly curve them upward and inward to go under your chin (Figure 112).
Step 3: As your hands curve under your chin, they will pass your throat and the upper chest until the backsides of the hands eventually touch. While this motion is occurring, your elbows will simultaneously move outward (Figure 113).
Step 4: As the arms begin to slightly rise and extend outward, you will begin to exhale. As the arms rise and extend, the palms will be turned during the motion and now face downward. So, your thumbs and index fingers will now be touching. (Figure 114).
Step 5: Continue exhaling through the complete extension. As the extension occurs, you should allow the natural force of the motion to pull your shoulders forward, thereby placing your body weight on the balls of your feet (Figure 115).
Step 6: As the palms turn up again, with pinkies touching, you will begin to inhale (Figure 111).
Step 7: You may continue the elbow circles six to eight more times.
Step 8: Now, reverse the movements. Inhale and slowly bend the elbows. The hands will curve slightly inward and downward this time
Step 9: As the hands, pass down toward the chest, the backs of each hand will now be touching. The elbows will be swung outward (Figure 116).
Step 10: Your inhalation should be finishing as the hands pass under the chin and each hands’ pinky fingers come together. (Figure 117).
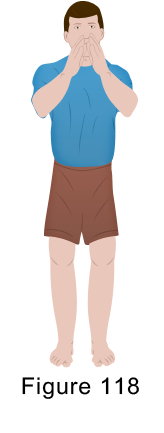
Step 11: As you begin to exhale, simultaneously extend your arms slightly down and out and circle the palms. At this point, your index fingers will connect with each other and your thumbs will connect with each other (Figure 118).
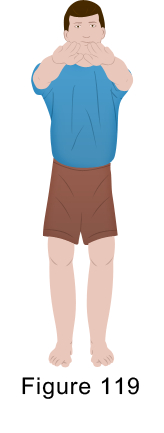
Step 12: Continue exhaling through the complete extension. As the extension occurs, you should allow the natural force of the motion to pull your shoulders forward, thereby placing your body weight on the balls of your feet (Figure 119).
Step 13: You may repeat the (reverse) elbow circles six to ten more times.
Key Points:
* your shoulder and elbow joints should be relaxed and soft during the movements
* you should feel how the shoulders circle and engage the back muscles as your arms extend
* let the natural force of the motion pull you forward so that your weight is on the balls of your feet


Hip Circles Directions: (Section 1)
Step 1: Begin with your feet at shoulder width and toes pointed straight ahead. Your hands should be on your hips (Figure 131).
Step 2: As if drawing a small circle using the tip of the tailbone, you will start to circle your sacrum in a clockwise direction. You should feel the muscles attaching to the tailbone and sacrum being used, but not the hips and legs. One circle is completed when you return to the starting point.
Step 3: You may continue this for ten to fifteen complete circle.
Step 4: Now, you may circle your sacrum in a counterclockwise direction for ten to fifteen complete circles.
Key Points
* remember to breathe naturally
* you might discover that smooth circles is more difficult in a specific area of the circle or in one direction or the other
* if you find an area or direction difficult, then relax to let the tailbone dip downward, trying to make as full of a circle as possible, but without forcing the motion
Hip Circles Directions: (Section 2)
Step 1: Begin by standing with your feet at shoulder width and toes pointed straight ahead. Your palms will be placed on each side of the waist. Your thumbs should be forward facing and resting atop the hip. The fingers should span across the middle spine area (Figure 132).
Step 2: You will turn your waist clockwise, making a circle. You will go to the right, rear, left, and back to center, while keeping your head centered and as still as possible (Figures 133-136).
Step 3: You may repeat the complete hip circle for eight to ten times.
Step 4: You will now turn the waist counterclockwise, going to the left, rear, right, and back to center.
Step 5: You may repeat the complete (counterclockwise) hip circle eight to ten times.
Key Points:
* maintain slow and light force movements
* breathe naturally
* make sure that your feet stay on the floor during the circles
* you should feel the joints in the hip open as close throughout the circles


Shoulder Tap Directions:
Step 1: Begin by standing with your feet at shoulder width and your toes pointed straight ahead. Your arms should be positioned at your sides.
Step 2: You will circle your waist to the left. This circle should propel each arm to swing across the body in a manner that will allow your right palm to make contact (tap) with the top of the left trapezius muscle on the shoulder and the back of the left hand to make contact with the right shoulder blade (Figures 127 and 128).
Step 3: You will immediately circle your waist in the opposite direction (right) in a manner. This circle should propel each arm to swing across the body in a manner that will allow the back of your right hand to make contact with the left shoulder blade and your left palm will make contact with the top of the right trapezius on the shoulder (Figures 129 and 130).
Key Points:
* you should breathe naturally and you don’t need to worry about coordinated breathing with this particular exercise
* imagine the arms as ropes that are attached to the waist and that swing as the waist circles
* each of your hands should make contact with their ending point simultaneously


Leg Sway Directions:
Step 1: Begin by standing with your left foot on a step, book, brick or such. Your right foot shouldn’t be touching the object that your left foot is standing on or the ground. Instead, it should hang freely in the air (Figure 144).
Step 2: Sway the right leg backward and forward (Figures 145 and 146).
Step 3: You may repeat the motion several times, as your endurance allows.
Step 4: Switch the swaying leg.
Step 5: Now, you will step on the object with your right foot and sway with your left leg.
Step 6: You may repeat the leg sways several times, as your endurance allows.
Key Points:
* the leg will sway most freely if you allow the hip joint to hang open
* breathe naturally
* maintain the height specified and don’t try to force the motion
BODY PULL


Body Pull Directions:
Step 1: Begin with your feet at shoulder width and toes pointed straight ahead. Your arms will be extended outwardly from the sides at shoulder height. Your palms are face down.
Step 2: Imagine you’re being pulled by the fingertips on your right hand to extend through these fingertips. You will let your right-side ribs slightly extend away from the body. You should turn your right palm upward and your left backward simultaneously (Figure 123).
Step 3: At this point, you should feel like your arms are a rope that is being pulled taut and twisted at one end. You will feel the pull from your right hand fingertips across the shoulders, down the ribs, and into the left hand fingertips.
Step 4: You will now reverse the body stretching so that your left hand fingers are extended and the left-side ribs are slightly extended away from the body. Your left palm will face upward and your right palm will face backward (Figure 124).
Step 5: Alternating sides, you will repeat the body stretching for six to eight times.
Key Points:
* you should feel the motion pulling you as if you are a twisted rope, but not forcing your joints and muscles into any action
* your shoulders, ribs, and chest should be relaxed during the movement


Low Back Stretch Directions:
Step 1: Begin with your heels together and your toes straight ahead. Your arms will be at your side.
Step 2: You will extend your left leg out in front of your body. Your heel should be on the ground and your toes should be pointed upward. You will point your right foot rightward forty-five degrees. Bring your arms behind your back so that your left hand is holding your right wrist (Figure 141).
Step 3: While keeping your hips in a forward facing position, you will exhale as you lean your upper body forwardly so that your upper torso falls toward your left knee (Figure 142).
Step 4: While holding the current position, you will inhale and exhale for three cycles of diaphragmatic breaths. You should feel your lower back widen as you fill it and your lower abdomen with oxygen.
Step 5: With your last inhalation, you will begin to slowly rise from the position and return to center.
Step 6: Now, you will extend your right leg in front of your body. Your right heel should be firmly on the ground and the right toes should point upward. While keeping your hips in a forward facing position, you will exhale as you lean your upper body forwardly so that your upper torso falls toward your right knee. Repeat the breathing exercise (step 4) and return to center.
Step 7: You may repeat the low back stretch, alternating right and left legs, for two to three times each.
Key Points
* the proper body mechanics for the low back stretch may be difficult to achieve at first
* it may be helpful to use a bench or stool until you become proficient (Figure 143)
* your breath can be used to help you relax muscles, open up the back, and increase range of motion
* slowly increase your range of motion, without forcing the stretching action
* remember to coordinate your breathing so that you’re exhaling on lowering and inhaling as the body rises


